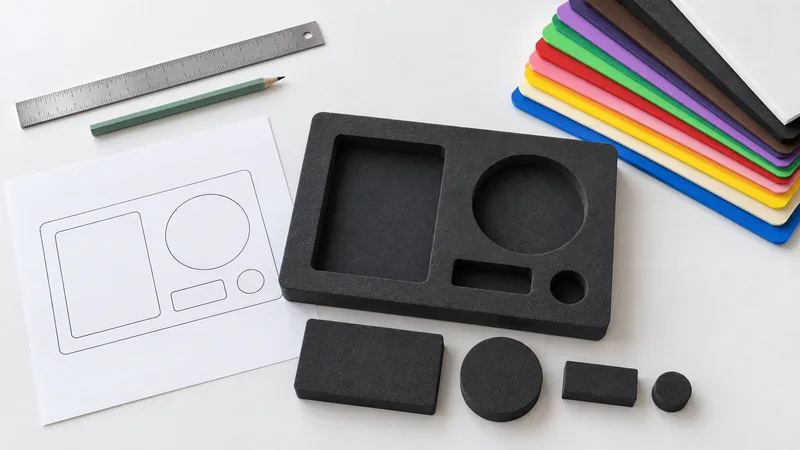
An EVA foam die-cut insert sample brief gives engineering, packaging and purchasing one controlled description of the component to review. The customer material identifies EVA Foam for packaging inner liners, footwear components and cushioning pads, with packaging, footwear and automotive directions. This guide keeps the packaging insert task specific: a product, an enclosure, cavities and a sample question. It does not turn the material family into a universal insert specification or imply that every conversion route is already confirmed.
Start with the EVA Foam material page and state why a die-cut insert is being considered. A flat outline, layered insert or shaped cavity can each solve a different packaging problem. Send the product drawing or sample, dimensions, expected volume and package envelope. If the design is still provisional, label it. A useful brief makes open decisions visible instead of hiding them in a drawing that appears final.
Describe the product and the protection task
Begin with the item the insert must receive. Show the complete envelope, fragile faces, protrusions, connectors, handles and surfaces that should not be touched. If the package contains accessories, include their position and removal order. A cavity cannot be reviewed meaningfully from the foam outline alone. The reviewer needs to see the product relationship and which contact points matter to the package.
Define the protection objective in observable language. The insert may locate an item, separate surfaces, cushion a contact or organize a kit. It may need a clear path for loading and removal rather than a tight cavity on every side. Describe what the operator must do and what the product should look like when packed. Keep any transport, impact or vibration requirement tied to its method and acceptance owner; a fit sample cannot prove a package-level result by itself.
State the package envelope and closure. Show lid clearance, neighboring cavities, dividers and any wall that constrains the foam. Note whether the insert is removed for inspection or remains in a reusable package. These details influence the cavity depth, finger access and replacement sequence. They also prevent a sample from being accepted on a bench even though the operator cannot load the product inside the real enclosure.
- Identify the product revision, orientation and sensitive surfaces.
- Show accessories, package walls and the closure sequence.
- Describe locating, separation, cushioning or organization as the task.
- Separate fit observations from transport or impact evidence.
Build a cavity-led drawing package
Put the insert drawing under revision control. Show datums, overall length and width, cavity positions, depth, wall width and any relief required for a feature. Mark the dimensions that control fit and the dimensions that are open to adjustment. If the product drawing and packaging drawing use different origins, show how they align. A clear datum scheme reduces the risk that a cut outline is interpreted from the wrong corner.
Show section views at the deepest cavity, a tight corner and any finger or tool access point. Mark bottom support and the distance to neighboring cavities. If a part sits on a ledge, identify the ledge and its purpose. If a product needs a soft landing rather than a hard stop, describe that requirement as a review question. Do not add a generic wall thickness or tolerance simply because another insert used one.
Identify edges and details that affect the proposed conversion route. Through-cuts, internal corners, thin bridges, layers, backing and adhesive questions may need separate review. The EVA sheets, rolls and custom inserts guide explains why format and geometry should be discussed together. The existence of a die-cut label does not prove that every thickness, edge detail or backing combination is available.
| Brief field | Useful reference | Question to resolve |
|---|---|---|
| Product reference | Drawing, sample, envelope and orientation | Which surfaces must be protected or located? |
| Cavity geometry | Profile, depth, wall width and reliefs | What controls fit and removal? |
| Material record | Proposed grade, density, hardness and thickness questions | Which values and methods need confirmation? |
| Conversion route | Die-cut outline, layers, backing or assembly | Which route and scope apply to this geometry? |
| Approval record | Sample objective, checks, owner and revision | What can the sample demonstrate? |
Record the EVA material questions
The knowledge base records EVA density of 50–190 kg/m³ and hardness of 15–75 Shore C as [需确认]. In the brief, treat them as questions for the proposed grade rather than as a complete grade table. Ask which density and hardness apply, how they are measured and whether the values are typical or release limits. Include nominal thickness, critical sections and tolerance questions beside the drawing.
Color may help orientation, inspection or product separation, but it is not a substitute for hardness or fit evidence. If color is part of the requirement, name the surface and inspection expectation. If the package needs a visual distinction between cavities, record how that should be checked. Do not infer a performance change from a color change or copy a color option from another material family.
Keep a material reference attached to every sample request. If an earlier sample is being reused, record its material identity, revision and purpose. A sample made for a cushioning pad may not represent the die-cut insert construction. If density, hardness or thickness changes, identify the affected cavities and repeat the checks that depend on those fields. The EVA hardness, color and thickness guide provides a focused checklist for the specification discussion.
- Mark density and hardness as [需确认] until a grade record is supplied.
- State nominal thickness, critical thin zones and tolerance questions.
- Describe color as an inspection or identification requirement only.
- Keep each sample linked to its material and drawing revision.
Plan loading, removal and inspection
Describe how the product enters the cavity and how the operator removes it. Identify finger access, lift points, pull tabs, clearance channels and any direction that must be followed. A cavity that holds the product securely may still slow packing or cause an edge to catch. Use the real product or a controlled representative during the sample review. Record the sequence, not only the final position.
Check contact and clearance at the same time. Look for unintended pressure on connectors, corners and finished faces. Check that neighboring cavities do not collapse the wall or make one item difficult to remove. Record visual marks, interference and local lift separately from any conclusion about long-term protection. These observations help refine the insert without claiming a measured packaging performance that was not tested.
Agree which dimensions will be inspected and how. Measure cavity depth, wall width, critical openings and overall fit with the proposed method. If a tolerance is undecided, record the measurement as information for review rather than marking it pass or fail. A method, specimen condition and drawing revision should travel with the result. Repeat the check when a cavity, thickness, backing or product revision changes.
Define the sample objective and acceptance owner
State whether the first sample is for concept, fit, handling or a production-representative review. A concept sample can answer whether the cavity arrangement is plausible. A fit sample can check the product and package interface. A production-representative sample needs an agreed relationship to the proposed EVA grade and conversion route. Do not allow one objective to stand in for another without recording the limit.
List acceptance questions before the sample arrives. Examples include loading direction, cavity identification, product contact, lid clearance, removal effort, edge condition and drawing dimensions. Assign an owner for each decision. Packaging may control workflow, engineering may control the drawing and quality may control a measurement record. The approval should state what passed, what changed and what remains open.
For terminology and possible test methods, the ISO standards directory and ASTM International are reference starting points. They do not establish a Green Foams certification or prove that an insert passed a package test. Select the method, specimen and conditions with the project owner and retain the evidence for the exact configuration reviewed.
- Identify the sample, material question and drawing revision.
- Load and remove the product using the intended package sequence.
- Inspect cavities, contacts, clearances, dimensions and edges.
- Record accepted observations, changes, evidence gaps and owners.
Keep tooling and commercial scope separate
A die-cut insert brief should describe the geometry and the proposed route without assuming a tooling package. Ask whether the shape, layers, backing, thickness and expected volume fit the route under discussion. If a fixture, knife, mold or another conversion aid is proposed, record it as a project question. Do not infer tooling ownership, cost, minimum order or delivery time from a material name or a photograph.
Separate development, sample and production quantities. Expected volume is useful for the route discussion, but it does not establish a universal commercial threshold. Request project-specific MOQ, timing, quotation scope and any inspection service after the material and sample objectives are clear. A quotation should identify the drawing revision, material proposal, conversion route and what the first sample can demonstrate.
Keep the record controlled when the product changes. A new accessory, projection or closure can change the cavity even if the EVA family remains the same. Reopen the affected checks and preserve the previous decision for traceability. If the route remains undecided, record the next input needed rather than forcing a preference. The result should be a sample brief that another reviewer can understand without a separate meeting.
For the broader packaging selection sequence, use How to Choose EVA Foam for Protective Packaging. For a comparison whose primary intent remains EPE versus EVA, use the EPE Foam vs EVA Foam comparison. This page owns the die-cut insert brief: its product interfaces, cavity drawing, sample objective and acceptance record.
Before sending the brief, attach the product reference, package envelope, controlled drawing, material questions, expected volume and sample checks. Mark every unconfirmed value or outcome [需确认]. Ask the supplier to respond against that exact revision. A well-structured EVA foam die-cut insert sample brief turns a packaging idea into a reviewable project while keeping material, conversion and evidence boundaries honest.