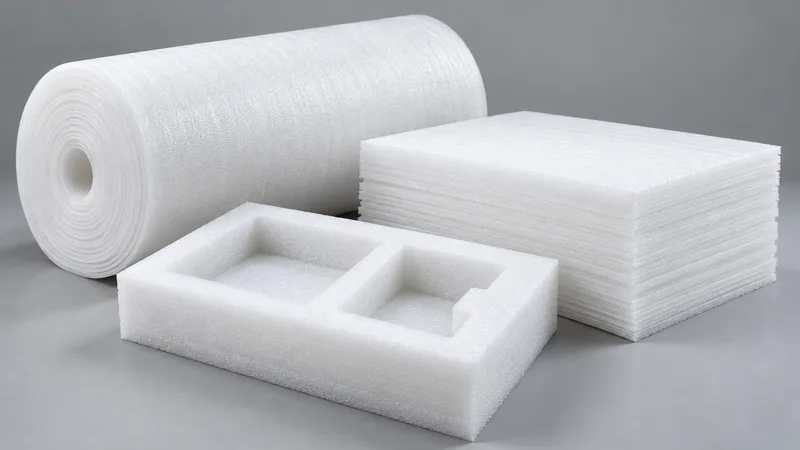
EPE foam is discussed in several practical formats. A sheet can create a flat separator or pad. A roll can support wrapping and continuous coverage. A custom insert can organize a product and its accessories in defined cavities. The right route depends on what the package must do, how an operator loads it and which surfaces must remain protected. This guide explains the differences so a buyer can prepare a useful brief before asking for a sample.
The EPE Foam product page gives the material-family context for packaging, including sheets, rolls and shaped or die-cut routes. The page is a starting point for a conversation, not a promise that every pictured format or parameter is available for every application. The planning record describes EPE for electronics and precision-instrument transport packaging, with density and sheet-thickness values marked for confirmation. Keep those values open until a proposed grade and test evidence are agreed.
Start with the package rather than the format name
Describe the product as it will be packed. Supply the overall envelope, projections and features that need clearance. Identify surfaces that may carry light contact and surfaces that must remain free. If the product has connectors, displays, controls or cables, mark them on a drawing or explain them with a representative sample. This information determines whether a flat layer, a wrap or a cavity provides the most controllable support.
Record the enclosure at the same time. Internal carton dimensions, closure flaps and any existing partitions can reduce usable space. A sheet may need to fold around a corner; a roll may need to pass around a handle; an insert may need to sit beneath a lid without compressing a sensitive feature. Review the complete pack because a material format that works around the product may fail when the box closes.
Map the operator's sequence. Note where the part enters, how accessories are positioned, when a cover is added and how the recipient removes the product. A repeatable sequence makes the sample review meaningful. If a roll relies on manual wrapping, show the overlap and removal steps. If a custom insert is loaded in one orientation, mark that orientation and include the same accessories in the sample.
- List the product, accessories and separate compartments required in the finished pack.
- Mark critical contact, keep-out and clearance surfaces on a drawing or sample.
- Provide enclosure dimensions, closure details and the intended loading and removal sequence.
- Separate confirmed requirements from questions about transport, storage or electrical contact.
Define what protection means for the project. It may mean preventing product-to-product contact, maintaining orientation or creating a buffer during handling. If transport performance is required, state the agreed evaluation method and acceptance criteria. Do not replace that work with a generic statement that foam is protective. The format should be judged against the actual requirement and the complete packed assembly.
How sheets support simple layers and blanks
Sheets are flat stock that can be cut, folded or placed as a layer. They are often a practical route when the package needs separation between surfaces, a top pad or a simple wrap blank. Begin with the required blank dimensions and the location of any folds or slots. Explain whether the sheet supports the product, separates accessories or protects the enclosure from abrasion. Each purpose creates a different check during sampling.
A sheet can be reviewed quickly when the product geometry is regular and the operator can position the layer consistently. That simplicity may be useful for a pack that changes frequently or for a secondary layer inside a carton. It can be less suitable when the part needs positive orientation or when accessories could move into a sensitive area. Ask whether another layer, partition or custom profile is needed before treating the sheet as the complete solution.
Review cut dimensions, edge condition and placement in the enclosure. Confirm whether the proposed thickness allows the carton to close and whether a fold changes the available clearance. If a sheet is laminated, printed, adhesive-backed or otherwise converted, record that construction in the brief rather than assuming it from an image. The EPE family description supports a sheet route; project-specific conversion and availability remain to be confirmed.
Use a representative pack for approval. Place the product and accessories in the intended orientation, close the enclosure and inspect exposed surfaces. Then remove the part using the planned sequence. Record shifting, trapped edges or surfaces that contact the carton. These observations are more useful than approving a nominal thickness without seeing the layer in its working position.
How rolls support wrapping and continuous coverage
Rolls provide a continuous length for wrapping or feeding a layer through a packing operation. A roll discussion should therefore include the operator method, not only the finished carton size. State how the material is cut, where the wrap begins, how much overlap is required and whether the pack is closed with another component. If the material is reused, describe how it is removed and stored between cycles.
Wrapping can accommodate products with changing outlines, but coverage may vary when different operators apply different tension or overlap. A sample should show the intended sequence and include any corners or projections that are difficult to cover. Check that the wrapped part can be inserted into the enclosure without catching an edge. If the product needs a defined orientation, add a guide, separator or insert and review that component with the roll.
Specify the roll width, proposed thickness and cut length only after the product envelope and wrapping sequence are understood. The planning record does not establish a universal roll size or guaranteed density. Ask for the grade and construction tied to the sample. Where performance data matter, record the test method and conditions so values can be compared on the same basis.
Rolls can work alongside sheets or inserts. For example, a wrap may protect an exterior surface while a flat layer separates accessories. Treat each piece as part of one package and check the interfaces. A wrapped component can change the cavity clearance; a separator can change how the part is removed. The design review should cover the assembly, not approve each format in isolation.
How custom inserts control geometry and handling
Custom inserts are shaped around a product, an accessory set or a defined loading route. They can use cavities, profiles or cut features to locate the part inside an enclosure. This route is useful when orientation, separation and repeatable placement are central requirements. It also requires more information at the start: a drawing or sample, critical dimensions, keep-out areas, cavity depth and the direction in which the product enters.
Separate the dimensions that control fit from the dimensions that describe the overall blank. Identify support points and surfaces that must not carry packaging loads. If an accessory shares the insert, show its cavity and removal path. The sample should include the actual part and enclosure so the team can check insertion, closure, extraction and any interference with connectors or controls.
Custom cutting may be discussed as die-cut, CNC or another conversion route, but the available process and tolerance must be confirmed for the specific design. Do not infer a production tolerance from a photograph or a general process label. Ask which dimensions will be inspected and how revision changes will be managed. The approved drawing should identify the material grade and construction under review.
| Review point | Sheets | Rolls | Custom inserts |
|---|---|---|---|
| Typical role | Flat separators, pads or blanks | Continuous wrap or layer | Part-specific cavities and profiles |
| Key input | Blank size and layer position | Part envelope and wrapping sequence | Drawing, sample and critical clearances |
| Operator check | Placement and coverage | Overlap, tension and removal | Orientation, fit and accessory access |
| Main risk to resolve | A layer shifts or leaves contact exposed | Coverage varies with handling | Cavity or enclosure does not fit the complete pack |
Review the sample with a written checklist. Check orientation, cavity engagement, accessory placement, carton closure and removal. Record any movement that could expose a protected surface. If the insert uses multiple layers, review the interfaces and the sequence for assembly. The sample demonstrates a proposed construction; it does not automatically establish transport performance, regulatory compliance or a permanent approval for future product revisions.
Confirm material grade, evidence and commercial scope
The planning record lists EPE density of 18–45 kg/m³ and sheet thickness of 0.5–100 mm as customer-provided parameters marked [需确认]. Treat them as discussion ranges, not guaranteed specifications. Ask which proposed grade applies to the sheet, roll or insert and request a data sheet connected to that grade. Confirm units, test method and conditions for every value used in the acceptance review.
Testing terminology can vary between laboratories and materials. The ASTM International standards catalogue and the ISO standards catalogue help teams identify methods and definitions for a testing brief. A catalogue link is a reference, not evidence that a particular grade complies or that Green Foams holds a certification. Select the applicable method with the project team and request the records needed for the proposed application.
Electronics packaging may add electrical, cleanliness or contact-material requirements. Record those conditions explicitly. The appearance or color of an EPE component does not establish an electrostatic property or a regulatory result. If the buyer needs such evidence, state the requirement and ask for grade-specific documentation. Keep it separate from the mechanical fit review so one successful check is not mistaken for approval of every requirement.
Commercial information belongs in the same brief. Share expected volume, delivery context, packaging instructions and any repeat-order assumptions. The current source set does not confirm minimum order quantities, lead times, sample fees or production capacity. Those terms require a project quotation. A sample can support that conversation, but it does not silently create a commercial commitment.
- Send the part drawing or representative sample with critical dimensions and enclosure details.
- Choose a sheet, roll or insert hypothesis based on the packing sequence and protection task.
- Review the sample for fit, coverage, loading, removal and the agreed acceptance criteria.
- Record grade, construction, revision, inspection points and commercial requirements before release.
Use revision control whenever the product, enclosure or accessory set changes. A small geometry revision can change a cavity or wrap clearance. Record which drawing and sample the approval covers, then revisit the package when a closure or packing step changes. This prevents an approval for one format from being reused for a different product without evidence.
For a related comparison, read EPE foam vs EVA foam for protective packaging and keep the same part and acceptance criteria on both sides. You can also review the EVA Foam product route as a separate material discussion. The useful outcome is a documented choice that connects the format, grade and packing method to the product requirement.
When the brief is ready, use the EPE Foam drawing-to-sample workflow to request a component review. Include the product, accessories, enclosure, expected volume and open questions. A concise record helps engineering, purchasing and the supplier evaluate the same configuration and makes later revisions easier to trace.